
Do you need some tips for making a perfect U.S. passport photo that meets the U.S. government’s requirements using GIMP (GNU Image Manipulation Program)? Or are you looking for some alternatives to GIMP?
Creating a suitable U.S. passport photo is important as it can make or break your passport application process.
In this article, we’ll guide you through creating a U.S. passport photo with and without using GIMP. Prepare the digital version of your passport photo and follow our guide to create or edit it easily.
Creating a U.S Passport Photo with GIMP
In this section, you will learn how to create a U.S. passport photo using GIMP, a free image editing software. We will show you how to crop the photo, adjust the photo size, and enhance the photo quality by using simple steps.
Cropping the Photo
First, open GIMP software on your laptop. Drag and drop your photo into it.
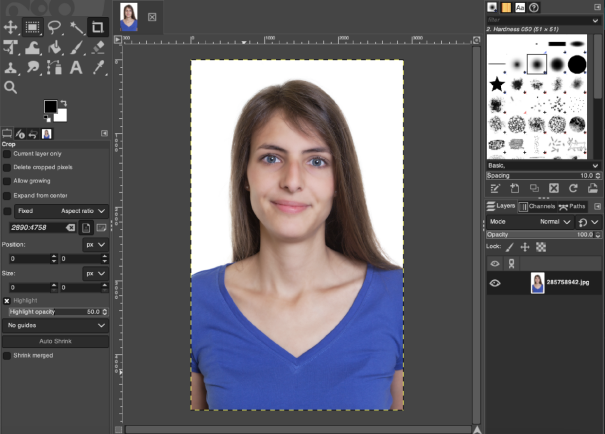
Then, click on the “Rectangle Select Tool” in the toolbar or press “R” on your keyboard. Press on your mouse to draw a selection around your face, making sure to leave some extra space around the head.
The final step is to click on the “Image” menu, and select “Crop to Selection.” The unwanted parts will be removed in this way.
Adjusting the Photo Size
Next, it’s time to adjust the image size according to the U.S passport photo requirements. The required size of the photo is 2 x 2 inches or 51 x 51 mm.
Right click on the image>Image>Scale Image.

In the dialogue box, make sure the “Aspect Ratio”(the chain symbol) is locked.
If you prefer to use the “pixels” (the default), then set the “Width” and “Height” to 600×600 pixels. You can also choose other measurement units from the dropdown menu.
If you choose “inches”, set the “Width” and “Height” to 2×2 inches. If you choose “millimeters”, set it to 51×51 mm.
Finally, click “Scale” to resize your image.

Enhancing the Photo Quality
After cropping and resizing your passport photo, it’s time to improve the qualoty of the photo.
We’ll adjust the color first. Right click on the image and choose Colors > Brightness-Contrast.

Drag the two sldiers to adjust the photo’s brightness and contrast. Find the balance and make sure your face is visible and there are no shadows.

Next, for photos that have a color cast, you might need to adjust the color balance. Skip this step if your skin tone is natural in the photo.
This time we’ll also right click on the “Colors”, but we’ll choose “Color Balance.” Adjust the color levels by dragging the sliders to the left or right to achieve natural skin tones.

Finally, you can sharpen your photo to make it clearer. Right click on the image and choose Filters > Enhance > Sharpen (Unsharp Mask). Adjust the Radius, Amount, and Threshold to achieve the desired results.

Alt-text: Using GIMP to Make the Photo Clearer
We hope these methods can help you creating a U.S passport photo using GIMP like a pro.
When you finish adjusting your photo, don’t forget to double-check the official requirements to speed up your passport application process.
Creating a U.S Passport Photo without GIMP – Alternatives
For those who do not want to download software or go through a steep learning curve, consider using some free online tools or in-store services.
Online Tools
Using a user-friendly online tool like aipassportphotos can save you a lot of trouble creating your U.S. passport photo manully. And it’s free to use.

Alt-text: Using AiPassportPhotos to Creat Your U.S Passport Photo
Open the website and you’ll see the clear and simple instructions teaching you how to start the automated image editing process.
Upload your photo and wait for 15 seconds for AI to scan it. The tool adjusts the size that meets the requirements automatically.
If you notice any imperfections in your passport photo, don’t worry about taking the photo again. Instead, use our AI-backed background removal tool to easily change the background from your photo. Once the background is removed, you can customize a new background that meets the official requirements.
Once the photo is processed, click “Get photos now” on the right top bar to save it to your computer. You can upload another photo by clicking “Retake photo” until you’re satisfied with the results.
Sound easy? Go try it for yourself to see how the tool saves you time and money.
In-Store Services
For those who prefer an offline experience and pay offline, go find a local store that offers passport photo services.
In the photo centers like CVS, Walgreens, and Walmart, the employees are experienced and they will make sure your photo meet all requirements.
Remember to review the photo before finalizing it and provide your suggestions if you’re not satisfied with the skin tone, the light, or whatever else.
Ask the employee how long you have to wait for the compliant photo and plan accordingly before applying for your U.S. passport.
Printing and Submitting the Passport Photo
Are you excited to have successfully created your U.S. passport photo? If you’re going to apply for your passport in person, it’s time to print and submit it. To ensure a smooth application process, follow these steps, especially if you are printing the photo at home:
First, use a quality photo paper to print the passport photo. Avoid using a paper with glossy finishes which will cause glare.
Next, set up your printer to the highest possible resolution for optimal results. Make sure the photo size is 2 x 2 inch (51 x 51 mm).
After the compliant passport photo is printed, trim the excess paper and it’s ready to be submitted. Be sure to check the office working hours before you go.
Frequently Asked Questions
What are the U.S. passport photo requirements?
The U.S. passport photo must be a 2 x 2 inches (51 x 51 mm) sized photo with a plain white or off-white background.
The photo must be at least 6 months old, and JEPG is the only format that can be approved. Besides these, there are a number of other factors that should be considered when taking a U.S. passport photo.
Read this article on our website for specifc guidelines.
What’s the best way to take or create a passport photo at home?
Understanding the requirements beforehead, and you can use either a smartphone or digital camera to take a passport photo at home.
The key is to use some free online tools to edit the photo according to the official requirements. For example, you can use AiPassportPhotos to help you create the photo automatically.
How can I change the background of the image using GIMP?
To change the background of the image in GIMP, follow these steps:
1. Open your photo in GIMP.
2. Select the white color area on the left sidebar. This will select the background color.
3. Change the background color by adjusting RGBLC.
4. Click on “OK” to save the background color.
How do I make a U.S. passport photo in Photoshop?
To make a U.S. passport photo in Photoshop, follow these steps:
1. Open your photo in Photoshop.
2. Select the crop tool from the toolbar, and set the dimensions to 2×2 inches (51 x 51 mm) at 300 dpi.
3. Adjust the photo within the crop boundary to avoid losing the proper frame.
4. Crop the photo and make any necessary adjustments for exposure, color balance, and brightness.
5. Save the edited photo.