
The PhilID (Philippine Identification Card) is a physical proof of identity issued by the Philippine Statistics Authority. There is an ID photo imprinted on the front and the micro-printed PSN and date of issuance, QR code, serial number as well as some basic information at the back. It can only be renewed when the demographic or biometric information needs updating. That is to say, the photo would stay on the ID card for years. As you have to show it in transactions, citizen benefits application, official registration, etc., it deserves spending some time in taking a good-looking Philippines idenfication image. In this passage, we would specify what is a qualified biometric photo and how to look good in ID photo.
Philippines ID Photo Requirements
Whenever preparing photos for any official document, it is essential to make sure that it satisfies the government specifications. Before introducing suggestions of taking good-looking photos, let’s learn about Philippines ID photo requirements.
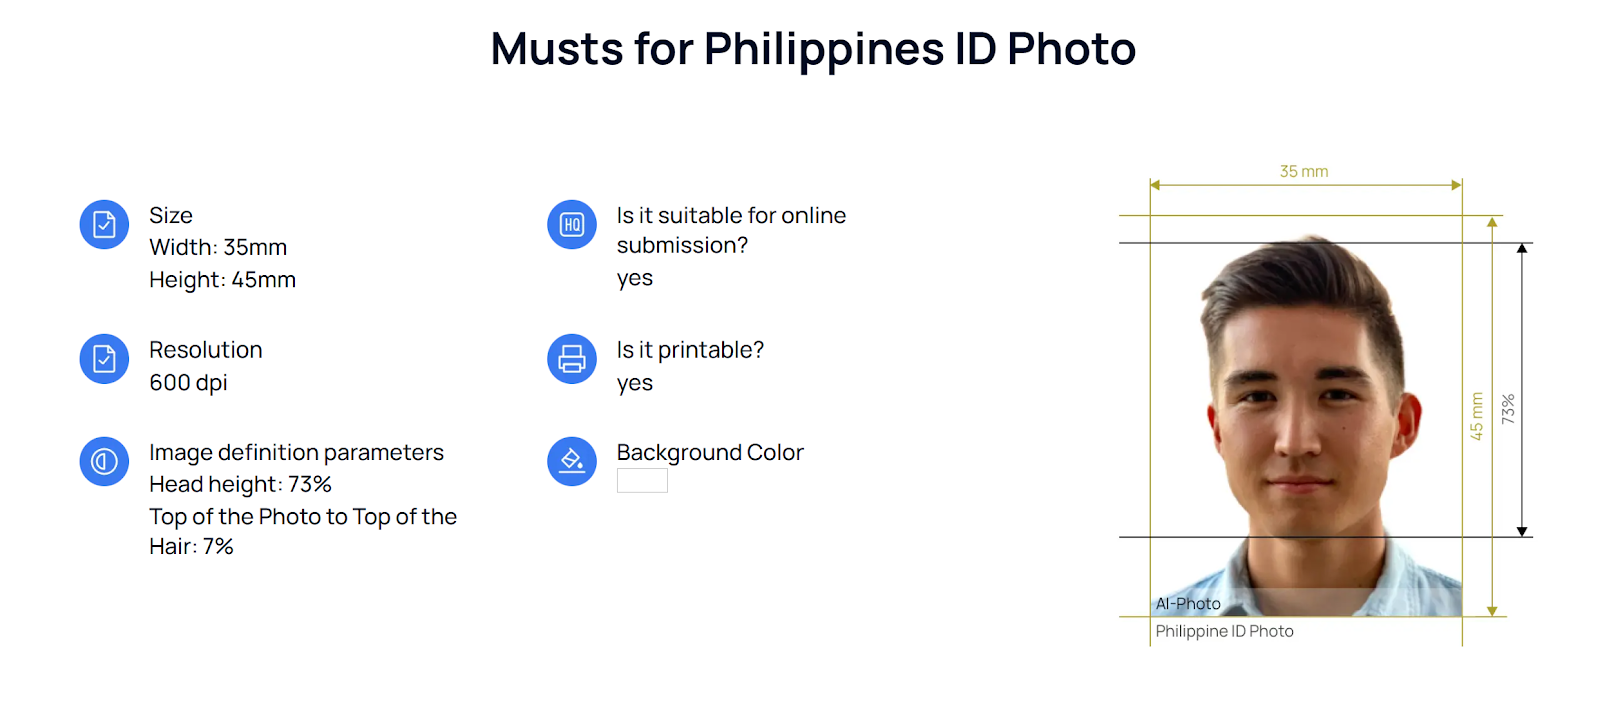
- Size: 35mm (width) x 45mm in height with head height occupying 73% and blank space over the head occupying 7%.
- Resolution: 600 dpi
- Background: white
- Take a bust with the head and shoulder visible.
- Keep a neutral facial expression and look straight to the camera. Don’t close eyes or open mouth.
- Take the photo in a well-lit environment so as to prevent shadows on the face.
How To Look Good in ID Photo
Most people are not satisfied with their formal photos because they focus only on the compliance and ignore the aesthetic. Well, there are some tips that can make you look more charming in an ID photo as follows.
Wear Decent ID Photo Clothes
As we have stated before, the ID photo background must be white, so white outfit is definitely not allowed because it will blend into the background. Please make sure that what you wear contrast with the backdrop. Solid colors like gray, brown, black, blue, etc are recommended. Don’t wear dazzling clothes like neon color, rainbow color, striped patterns, or camouflage.
For formal documents, ID photo clothes must be decent. Vests, turtlenecks or uniforms are not the first choice. Just put on a common shirt or T-shirt.
Practice Smiling Beforehand
Are you confused by the requirement of “neutral facial expression”? Don’t be nervous. You can practice it. Learn to smile by gently lifting the corner of your mouth and not showing the teeth. Don’t pout, frown, raise eyebrows, laugh out loud or make faces. Do it in front of a mirror until your expression looks natural.
Don’t Glare at the Camera
Although it is required to open eyes, forcing the eyes to keep open might make you look exhausted. There is a small trick. Ask the photographer to count “1, 2, 3” before pressing the shutter button. You can close your eyes and don’t open them until you hear the “3”.
Take Care of Your Hair
The only requirement for ID photo is that don’t let the hair cover any part of your face. Perhaps making a grand hairstyle is OK. If not, remember to wash your hair before taking pictures so as to keep it soft and fluffy. For long hair, tuck it behind the ears or tie a ponytail. For short hair or bangs, gel it in case of flopping over foreheads and eyes.
Put on a Light Makeup
The pure ID photo background makes bare face dull. Proper makeup would make you look more refreshed in the picture. Light makeup refers to a natural base close to your skin color, nude lipsticks, and eyebrow filling. Heavy makeup like shimmery eyeshadows and lipsticks would result in rejection of your application because they will not only cover your original appearance but also reflect and generate a white cast while exposed to flash.
If you are good at makeup, you can skillfully apply shadows and highlights to contour the face, which helps to create a more symmetrical and chiseled shape.
Keep the T-zone Shine-free
T-zone refers to area of the forehead, nose, and chin which easily get oily. The oily T-zone might reflect in front of a camera and pose shadows on the face. So, please use oil blotting paper so as to make you look more cheerful.
Treat Blemishes Beforehand
Pimples, spots and zits would lead to a flawed ID photo and that can’t be easily addressed by instant skincare. If you want to look good in the photo, it is recommended to visit a dermatologist and book a spot treatment.
Dark circles would make you look depressed in ID photo. Provided that you don’t sleep well last night, you can apply brightened undereye concealer so as to lift up your face.
Take the Advantage of Natural Lighting
Lighting plays a significant role in photo quality. If possible, choose a sunny day and face the sunlight so that your face is well-lit. Add some artificial lighting if possible. Don’t turn your back to the sunshine. Don’t stand on any side of the sunshine in case of projecting shadows on the other side.
Take More Photos to Choose from
It is not easy to take a perfect shot at once. It is suggested to take several pictures so you have more options to choose from.
Use ID Photo Editor
By following the tips above, you have taken your photo, but you still have to make adjustments to satisfy the official standards, such as cropping ID photo size, aligning and changing ID photo background.
Have no idea about how to edit photos? We have AiPassportPhotos, an online ID photo editor. This tool is equipped with multiple ready-to-use photo templates, including Philippines ID photo.
Compared with turning to a physical store, AiPassportPhotos features more the advantages below:
- ID photo editor online allows you to make a perfect picture without going out as long as your have devices connected to the Internet.
- It costs 2 credits to download one ID photo and the lowest package (3 credits included) charges $2.99, which is much cheaper than studios or retail stores. The good news is that new users would be given 5 credits for free, and you can earn credits by inviting new users. It is free of charge to upload and preview the final results, which means you can try until you get the most desired one.
- There is built-in compliance checking program to ensure the acceptance of the photo. In this case, you don’t need to worry about the photo quality.
Summary
In this article, we have introduced some tricks about how to look good in ID photo, covering personal image and surroundings. Whether you ask for a photographer or take pictures at home, these deserve following up. No matter how confident you are in taking a perfect shot, it is strongly recommended to use a ID photo editor as an assistant. It would add security to get approval, which save you time and money in uploading ID photo again and again.