
It is always essential to have a compliant photograph whether it is your first passport application or you are renewing your passport. The age of digital convenience makes it possible to take photos at home. Nevertheless, the shift from a physical photo studio to a home setup brings with it a new set of challenges: What equipment do you need? How can you ensure the photo meets strict passport standards? And perhaps the biggest debate of all: should you opt for a digital camera or simply use your smartphone?
No more questions as this comprehensive guide will delve into taking perfect passport photos with digital cameras. We will explore everything from the essential equipment to the best practices for photographing both adults and children. And for those curious about the pros and cons of using a digital camera versus a smartphone, we’ve got that covered too. Now, buckle in!
What You Need for Taking Passport Photos with Digital Cameras
Creating that picture-perfect passport photo at home can be an easy task if you have the right tools at your disposal. Here’s a detailed look at what you’ll need:
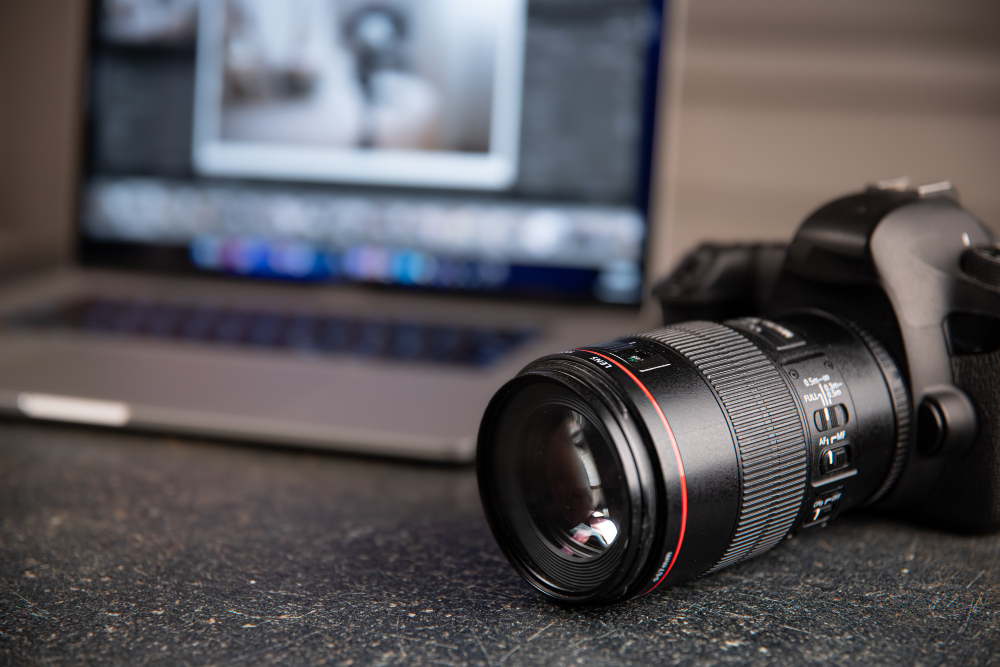
Digital Camera
The heart of this setup is your digital camera. Aim for a camera that can produce high-resolution images to achieve the best print quality. But this doesn’t necessarily mean you need the latest professional DSLR. Many point-and-shoot cameras and even some advanced compact cameras can provide more than satisfactory results.
Tripod
Stability is crucial when taking passport photos. Any blurriness or distortion can result in your photo being rejected. That’s where a tripod comes in handy. Remember to set your camera to eye level for the most flattering and accurate shots.
White or Off-white Background
In many countries, passport photos require a white or off-white background. This could be as simple as a plain wall in your home, a white poster board, or even a professional photography backdrop if you have one.
Photo Paper and Printer
Finally, if you’re planning to print your passport photos at home, you’ll need some high-quality photo paper and a reliable printer. Choose a thick photo paper for the best quality and most durable results. As for the printer, ensure it’s capable of producing high-resolution images and has enough colored ink to print a clear, bright picture. Besides, ensure that the settings align with the required photo size and paper type for passport photos.
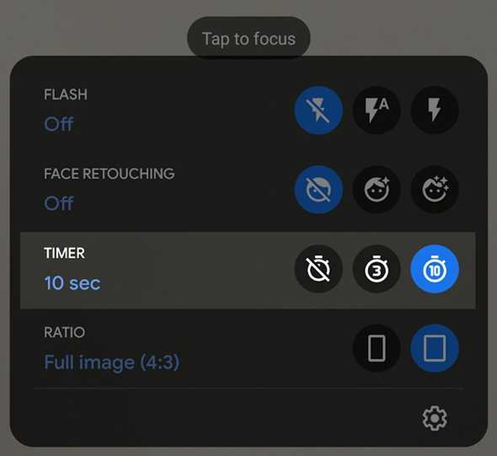
If you are taking the photo by yourself, remember to use the timer option.
Tips for Taking Digital Camera Passport Photos
Crafting that flawless passport photo may seem a complex task, but with the right tips, you’ll navigate the process like a professional. Here are some key considerations to keep in mind when posing for your passport photograph:
Facial Expression and Makeup
Maintaining a natural, neutral facial expression is a must in a passport photo. Your look should be relaxed, with eyes open and directed at the camera, with neither a smile nor a frown. When it comes to makeup, less is more. Avoid heavy cosmetics and excessive facial shine to ensure your features are clearly visible. Otherwise, your passport application may be rejected as it is hard for the authorities to recognize you.
Clothing and Accessories
When choosing your clothing, steer clear of light-colored or black attire that may interfere with the contrast between you and the background. Religious headwear is acceptable as long as the face remains visible. Avoid extravagant or overly flashy outfits that might cause photo rejection.
Regarding accessories, a passport photo needs to depict an unobstructed view of your face, so remove any accessories such as hats, headbands, and glasses that may interfere.
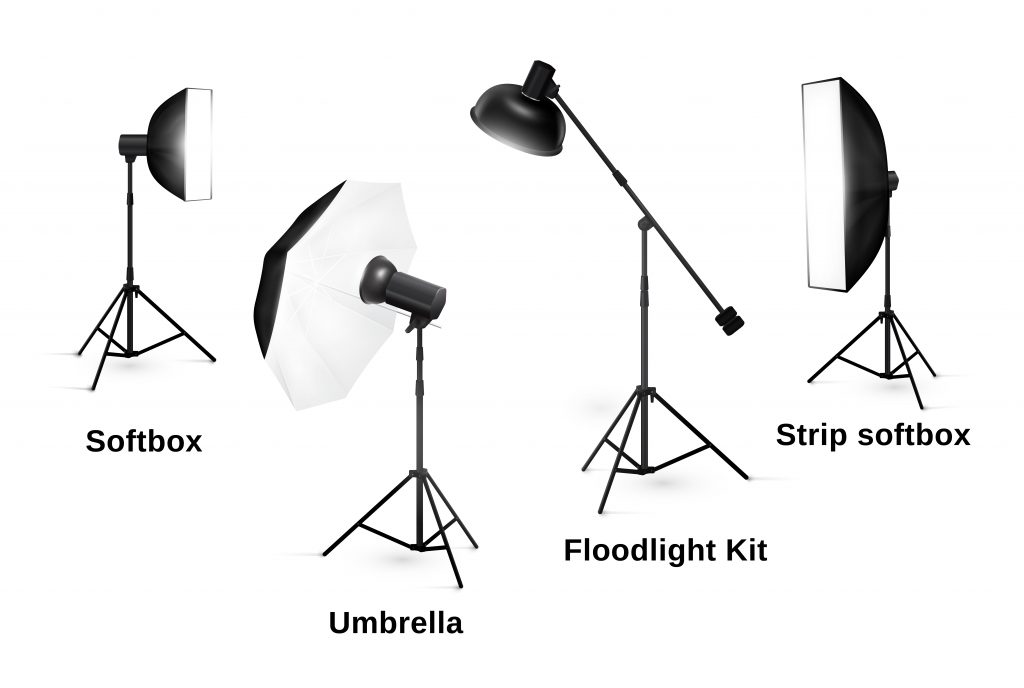
Lighting Setup
Lighting can make or break a photo. Locate your camera in a well-lit area, preferably with natural light. Avoid harsh shadows on your face, as well as overexposure or underexposure. will make your facial features clear and ensure your photo meets the required standards.
Body-Camera Distance
As a rule of thumb, position your camera approximately 1.5 to 2 meters (5 to 6.5 feet) away to capture your head and shoulders, leaving some empty space for cropping. Then, sit or stand upright, facing the camera directly. This distance should help you attain the required proportions for your photo.
Taking Digital Passport Photos for Children
Taking passport photos for adults can be a straightforward process once you’ve grasped the guidelines. However, photographing children, particularly young ones, can pose its unique challenges. Here are some key pointers to consider:
Facial Expression and Position of the Child
According to official requirements in many countries, such as the United States, the United Kingdom, and India, infants under one year are allowed to have their eyes closed in their passport photos, while children older than that should open their eyes. When photographing an infant, ensure they are on a flat surface with a white or off-white background. For older children, use simple distractions to direct their gaze toward the camera.
Proper Framing and Resizing
Make sure that the child’s head and shoulders fit within the frame, with some room for cropping. The distance guidelines of approximately 1.5 to 2 meters (5 to 6.5 feet) apply here as well, but you may need to adjust based on the child’s size.
After the Photos Are Taken
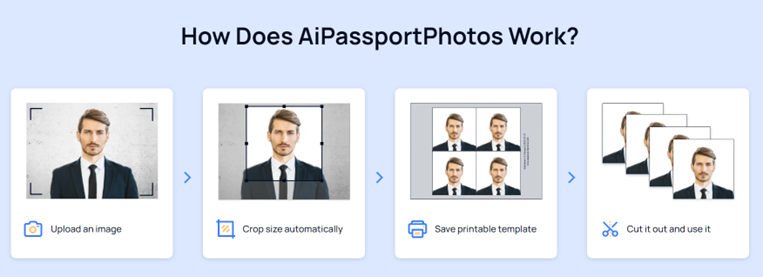
Once you’ve captured that perfect shot, the next step is to ensure it meets all the official requirements. Traditionally, this could mean a frustrating ordeal of fine-tuning size, background, and lighting. Any slip-up might lead to delays or even rejections. But now, you can leave the technicalities to AiPassportPhotos!
Powered by advanced AI technology, AiPassportPhotos provides you with effortless photo resizing and background removal. Simply go to AiPassportPhotos’ website, choose the type of photo you want to generate in “Select Document Type”, such as “US Passport Photo”, and upload your photo.
Then, the engine will automatically process your photo according to the latest official specifications it retrieves from the Internet in real time, and just in seconds, it offers you a 100% compliant passport photo. By paying credits, you can download the processed photo, which you can print out in a random photo-copying store, or even order a printable template delivered straight to your home.
Which Is Better, Taking Passport Photos with Digital Camera or Smart Phone?
When it comes to taking passport photos, two popular options are digital cameras and smartphones. But which is the better choice? The answer largely depends on your specific situation.
Digital Camera
Digital cameras tend to offer superior image quality thanks to larger sensors and higher megapixel counts. They can also give you more control over aspects such as focus, exposure, and white balance, allowing for more professional-looking results. However, they can be more cumbersome and require additional equipment like a tripod, and they may be a bit difficult to harness for novices.
Smartphone
On the other hand, smartphones provide unparalleled convenience. They are always at your fingertips, and their cameras have improved remarkably over the years. Most modern smartphones can take high-quality images suitable for passport photos. However, they may still lag behind dedicated digital cameras in terms of the level of control and image quality.
Ultimately, the choice between a digital camera and a smartphone comes down to your needs and circumstances. If you prioritize image quality and control and don’t mind a more complex setup, a digital camera may be the way to go. If convenience and ease of use are your main concerns, then a smartphone would be an ideal option.
Summary of Taking Digital Camera Passport Photos
Taking passport photos with a digital camera may seem challenging, but with the right equipment, a few tips, patience, and most importantly, a perfect photo resizer, it’s a task anyone can master. Attention to detail is critical, as even the smallest elements can make the difference between a photo that passes and one that gets rejected. With a digital camera, you have the advantage of advanced features like optical zoom, adjustable exposure, and superior image quality.
By harnessing the power of your digital camera and the convenience of online photo adjustment services, you’ll not only be ready to take excellent passport photos but also grow as a photographer. No matter your starting point, every step in this journey equips you with more knowledge and expertise in the fascinating world of photography.
Frequently Asked Questions
1. Which camera is best for taking passport photos?
If you’re new to photography, consider the following entry-level DSLRs with kit lenses: Nikon D3500 (with a Guide mode that teaches you how to shoot), Nikon D5500 or D5300, Canon EOS Rebel T6i (top DSLR recommendation for amateurs). If you don’t know the first thing about cameras, basically all modern digital cameras will do.
2. Can I use a selfie as my passport photo?
Definitely not. In a selfie, the body-camera distance is not long enough. Furthermore, it is impossible to maintain the right angle when taking a selfie with a digital camera. All these will cause passport rejection.