
Creating the perfect passport photo is always challenging—you should strive for compliance with the complicated regulations, and meanwhile, present your best self. Adobe’s Lightroom, often compared to its sister software Photoshop, can offer a streamlined and easy-to-use platform for both novices and professionals. With a user-friendly interface, it excels in photo organization, raw file handling, and batch processing, making it an ideal choice for creating passport photos. This guide will introduce to you Lightroom features that can help you craft passport photos and show you every single step, from taking the photo, editing the photo in Lightroom, to printing the edited photo. Without further ado, let’s begin!
What Is Lightroom
Adobe Lightroom is a powerful photo editing and organization tool in the extensive Adobe suite. Compared to the more renowned Photoshop, which is designed for deep, pixel-level editing, Lightroomis tailored for those who need a seamless workflow from importing to exporting. Its user-friendly interface greatly facilitates photo management, batchediting, and non-destructive adjustments, enabling you to play with exposure, color, and cropping without permanently altering the original image.
Therefore, Lightroom is a tool that blends ease and excellence for those aiming to produce flawless passport photos.
Lightroom Features to Help Create Passport Photos
From Lightroom’s extensive offerings, somefeatures stand out to help craft your ideal passport photo:
- Library Module
As a photo organizer in nature, Lightroom provides the Library Module that allows you to view, sort, flag, and tag your photos effortlessly, which comes in handy when you need to pick the best photo for your passport from multiple shots.
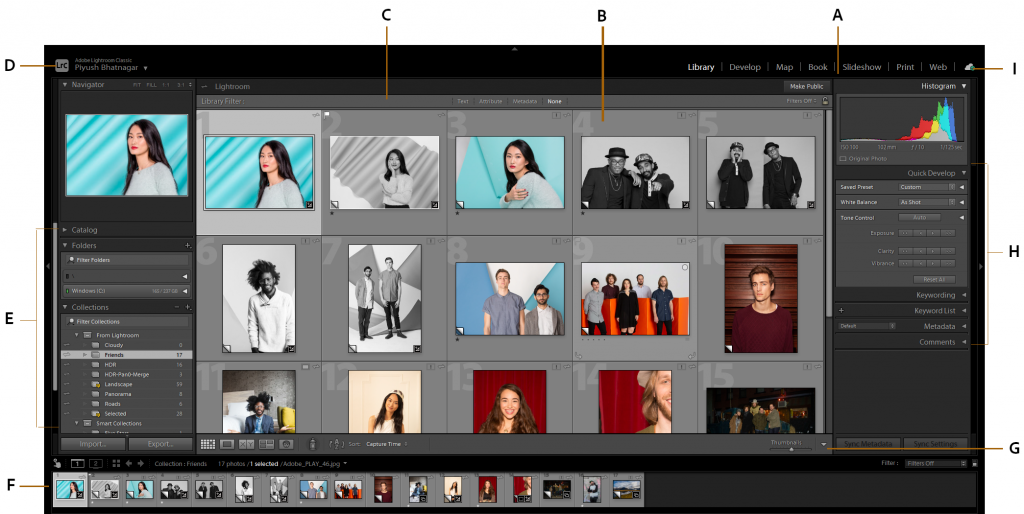
image resource: Adobe support
- Crop and Straighten Tool
Lightroom’s Crop Overlay provides grid lines, aspectratios, and customizable dimensions to ensure your photo meets the strict sizerequirements for passports.
- Spot Removal
This feature allows for quick fixes, removing minor blemishes or dust spots from the image. This ensures a clean, clear portraitwithout having to dive deep into detailed retouching. But always remember thatyou are not allowed to alter your facial features in passport photos.
- White Balance Selector
It is crucial to present your accurate skin tone. The White Balance tool can help neutralize color casts and ensure the skin tones appearnatural and true to life.
- Tone Curve
This powerful tool allows for precision in adjusting the tonal range and contrast of the image. It’s especially handy to ensure the facial features and expressions are clear and recognizable.
- Adjustment Brush
Adjustment Brush lets you apply slight adjustments to specific parts of the image, which can be extremely helpful when you want to brightenthe eyes, soften skin texture, or make minor corrections without affecting theentire image. You have precise control over where and how the adjustments aremade.
- Graduated and Radial Filters
These tools let you apply adjustments in a gradual manner. For passport photos, this can be particularly helpful if, for instance, oneside of the face is slightly darker due to lighting conditions. You can balancethe exposure seamlessly using these filters.
- Lightroom Passport Photo Plugin
For those looking for a more automated solution, the Lightroom Passport Photo plugin is a game-changer. It offers pre-set templates adhering to the size and dimension guidelines of different countries, efficient batch processing, and enhanced export options suitable for printing or onlinesubmission.
How to Generate Passport Photos with Lightroom
Lightroom offers a slew of tools to help you create your ideal passport photo. Here’s a step-by-step guide to streamlinethe process:
Taking the Photo
Nowadays, you don’t need to take passport photos in professional studios. A smart phone or a digital camera will do. So you are free to DIY your photo by following the tips:
- Facial Expression and Makeup
Maintaining a natural, neutral facial expression is a must in a passport photo. Your look should be relaxed, with eyes open and directed at the camera, with neither a smile nor a frown. When it comes to makeup, lessis more. Avoid heavy cosmetics and excessive facial shine to ensure yourfeatures are clearly visible. Otherwise, your passport application may be rejected as it is hard for the authorities to recognize you.
- Clothing and Accessories
When choosing your clothing, steer clear of light-colored or black attire that may interfere with the contrast between you and the background. Religious headwear is acceptable as long as the face remains visible. Avoid extravagant or overly flashy outfits that might cause photo rejection.
Regarding accessories, a passport photo needs to depict an unobstructed view of your face, so remove any accessories such as hats, headbands, and glasses that may interfere.
- Lighting Setup
Lighting can make or break a photo. Locate your camera in awell-lit area, preferably with natural light. Avoid harsh shadows on your face, as well as overexposure or underexposure. will make your facial features clearand ensure your photo meets the required standards.

- Body-camera Distance
As a rule of thumb, position your camera approximately 1.5to 2 meters (5 to 6.5 feet) away to capture your head and shoulders, leaving some empty space for cropping. Then, sit or stand upright, facing the camera directly. This distance should help you attain the required proportions foryour photo.
- Background
You are required to submit a passport photo with a plain white background, so a wall or a white board will do. But is you can’t find asuitable background, use Lightroom to “cover” it!
Importing into Lightroom
- Launch Lightroom and choose the “Library” module.
- Click on the “Import” button located at the bottom left.
- Navigate to the location of and select your photo(s), and click “Import”.
Editing in Lightroom
Now you are free to adjust your photos according to your specific needs with a wide range of Lightroom features. Here, we will introduce the most commonly used solutions:
- Crop and Straighten: Navigate to the “Develop”module. Use the“Crop Overlay”tool to select the specific aspect ratiorequired for a passport photo. Ensure the face is centered and fits within thespecified dimensions. Use the“Straighten” tool if the image is tilted.
- White Balance:Use the “White BalanceSelector” tool to ensure accurate skin tones.
- Tone and Presence: Adjust the exposure, contrast, highlights, shadows, whites, and blacks to ensure the photo iswell-balanced.
- Spot Removal: Use this tool to removeany blemishes or imperfections.
- Adjustment Brush:Make selectiveadjustments, such as brightening eyes or evening out skin tones.
- Passport Photo Plugin: If you have the Passport Photo Plugin, now is the time to use it. Choose the template for the specific country’s requirements and apply it to your photo.
Exporting the Edited Photo
- Click “File” and then “Export”.
- In the “Export” dialog box, choose the desired file format (JPEG is commonly used for passport photos).
- Set the quality (usually 100 for best quality).
- Adjust the resolution as required (typically 300 dpi for printing).
- Choose the export location and file naming convention, then click “Export”.
Printing the Photos
Once you’ve perfected your passport photo within Lightroom, the next crucial step is ensuring it translates well to print:
- Choosing the Right Paper
- Type: Matte paper is generally preferred over glossy for passport photos as it doesn’t reflect light, ensuring the photoremains clear under various lighting conditions.
- Quality: Opt for a high-quality paperthat presents sharp details and accurate colors. A heavy weight paper around 200-300 gsm is typically a good choice.
2. Lightroom Print Settings
- Go to the “Print” module in Lightroom.
- Under “Print Job” on the right panel, select “JPEG File”for“Print To”.
- Set the “File Resolution” to 300 ppi.
- Ensure “Color Management”is set to the correct printer andpaper profile. If unsure,
- “Managed by Printer”is a safe defaultchoice.
- Adjust the “Print Sharpening” based on your preference. Forpassport photos, a standard amount set to“Matte Paper”usually workswell.
If you can’t be bothered to print by yourself, you can go to any photo-copying stores like Walmart, Walgreens, Rite Aid, and Costco.
Wrapping Up
Adobe Lightroom can make creating professional-quality passport photos at home easier than ever before. This comprehensiveguide has equipped you with the necessary knowledge to navigate every crucial step from shooting the ideal portrait to refining its details to ensuring aquality print. You can comply with the strict regulations, and meanwhile, showcase your best self, all with ease and confident. Now, you are free to embrace the freedom and flexibility Lightroom offers. Go create your perfect passport photo to unlock wonderful international journeys!